
Dealing with the “Popcorn” Problem A Safe Guide to Smooth Ceilings
We’ve all been there. You’re lying in bed, staring up, and all you can see is that bumpy, dust-collecting texture that looks like it belongs in a 1974 disco lounge. Popcorn ceilings—or “acoustic ceilings” if you want to be technical—were the gold standard for decades. They hid imperfections and dampened sound, but today? They’re mostly just a dated eyesore that makes a room feel smaller and dingier.
But here’s the thing that stops most homeowners in their tracks: asbestos.
If your home was built before the mid-1980s, there’s a real chance that those little bumps contain asbestos fibers. It’s a scary word, I know. But it doesn’t have to be a project-killer. Whether you’re looking to modernize your living room or just want a cleaner look before diving into Florida interior paint colors, you need a plan that prioritizes your health over your haste.
If this feels like a bit much to handle on your own, you can always reach out for a free quote and let a professional team take the lead. But if you’re determined to understand the process, let’s walk through it together, coffee in hand.
What You Need Before You Start
Before you even think about grabbing a scraper, we need to talk about prep. This isn’t like painting a bedroom where a few drop cloths and some blue tape will do. Removing texture is messy, and if asbestos is involved, it’s potentially hazardous.
The Toolkit
- An Asbestos Test Kit: This is non-negotiable for older homes.
- EPA-Approved Respirator (N100 or P100): Not a cheap paper mask. A real one.
- Pump Sprayer: To keep the material wet (this keeps fibers out of the air).
- 6-mil Plastic Sheeting: Enough to cover every square inch of the floor and walls.
- Large Scraper: A 6-inch or 10-inch taping knife works wonders.
- Dish Soap: A few drops in your water sprayer helps it penetrate the texture.
Step-by-Step Instructions
Step 1: The “Scrape-Free” Test
Look, I can’t stress this enough: test before you touch. You can buy a kit at most hardware stores or hire a pro to take a sample.
You’ll need to put on your respirator, dampen a small spot, and scrape a tablespoon of the texture into a baggie to send to a lab. If the results come back positive (over 1%), the EPA generally recommends you hire a licensed abatement professional. If it’s negative? You’ve got the green light for a DIY weekend.
Step 2: Total Room Lockdown
Popcorn removal is a “wet” job, and it creates a slurry that sticks to everything. Move all furniture out of the room. Cover the floors with plastic and run it about a foot up the walls, securing it with tape.
Tip: Turn off your HVAC system and cover the vents. You don’t want any stray dust getting sucked into your ductwork and circulated through the house for the next ten years.
Step 3: Saturate, Don’t Soak
Fill your pump sprayer with warm water and a squirt of liquid dish soap. Spray a 4×4 foot section of the ceiling. You want it damp, not dripping. Wait about 15 minutes for the water to soak in.
Warning: If your ceiling has been painted over, the water might not penetrate. You’ll know within a few minutes. If the water beads up, you’ve got a much harder job ahead of you that might involve dry-scraping or sanding—which you should never do if there’s an asbestos concern.
Step 4: The Big Scrape
Using your taping knife, gently slide the texture off. If it’s wet enough, it should come off like wet oatmeal. Work in small sections to ensure the material stays damp. This is the “magic moment” where you finally see the flat drywall underneath.
Step 5: Drywall Surgery
Once the popcorn is gone, you’re going to see why it was put there in the first place. You’ll likely find visible joints, nail heads, and maybe a few gouges from your scraper. This is where drywall repair and patching comes into play. You’ll need to apply joint compound, sand it smooth, and repeat until the surface is perfect.
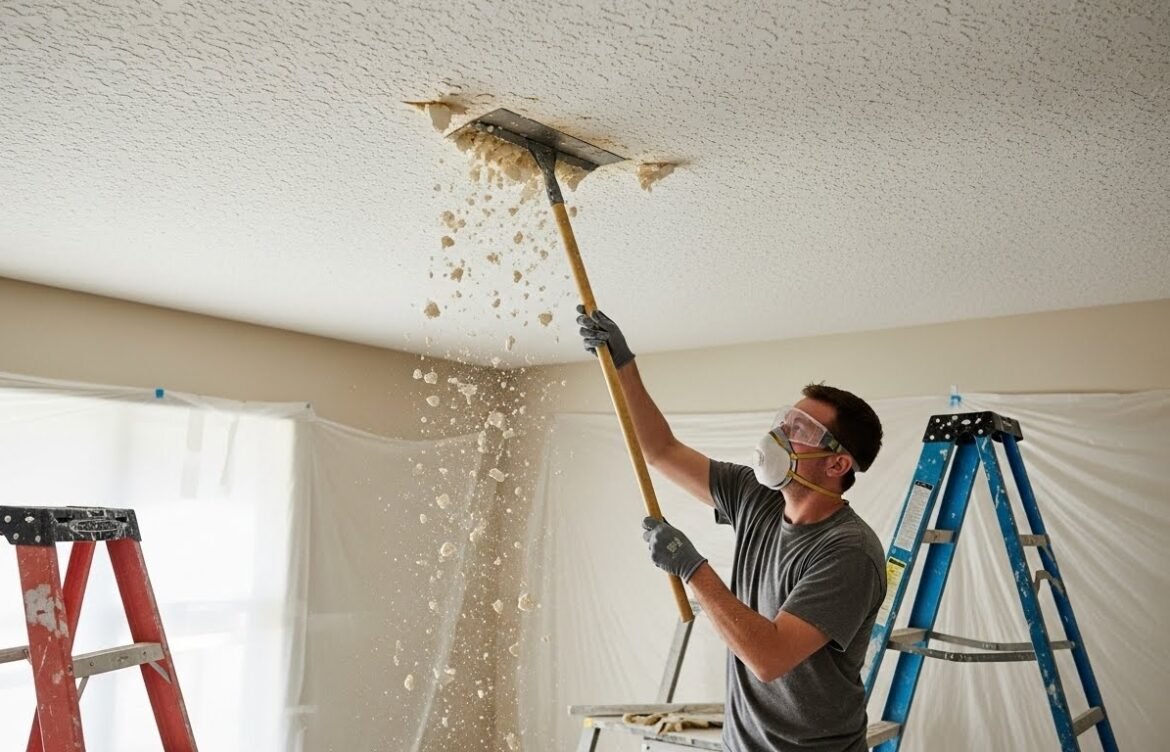
Visualizing the Process
[IMAGE: A photo of a room completely draped in clear plastic sheeting, covering walls and floors, with a worker wearing a full respirator and goggles.] This shows the level of containment needed to keep your home safe.
[IMAGE: A close-up of a metal scraper removing a damp, greyish texture from a white ceiling, revealing the smooth grey drywall underneath.] Note how the texture is coming off in thick, wet clumps rather than dust.
Troubleshooting Common Snaffles
- The water isn’t soaking in: This usually means the ceiling was painted with oil-based or semi-gloss paint. Honestly, at this point, it’s often easier (and safer) to just install a 1/4-inch layer of new drywall over the old ceiling.
- Gouging the drywall: It happens to the best of us. If you’re digging into the paper, you’re holding the scraper at too steep an angle. Keep it as flat as possible against the ceiling.
- The mess is everywhere: If your plastic is slipping, stop and re-tape. The “slurry” is much easier to wrap up in plastic and toss than it is to scrub out of a carpet.
Expert Insights for a Professional Finish
I’ve seen a lot of homeowners get the texture off but fail at the finish. Here’s a pro tip from the precisionpaintexperts playbook: Never skip the primer. Once you’ve scraped and sanded, that drywall is incredibly “thirsty.” If you go straight to your topcoat, it’ll soak in unevenly and look blotchy. Use a high-quality, high-build primer to seal the surface. This is especially true if you’re working on Gainesville historic home colors where the older plaster might be even more porous than modern drywall.
Also, think about the light. Ceilings catch light from windows at an angle that highlights every single bump and ridge. Take a bright flashlight, hold it against the ceiling, and shine it across the surface. This “raking light” will show you exactly where you need more sanding or another skim coat of mud.
Summary & Next Steps
Removing a popcorn ceiling is one of those projects that offers a massive “bang for your buck” in terms of home value and aesthetics. It’s hard work, and the asbestos factor requires a serious level of respect and caution, but the result is a home that feels ten years younger.
Your Action Plan:
- Verify the age of your home.
- Order an asbestos test kit today.
- Decide if you have the patience for the prep and the “mudding” required afterward.
If you find that the testing comes back positive, or you just don’t want to spend your next three weekends on a ladder, we specialize in popcorn removal and ceiling painting. We have the gear to do it safely and the skill to make that ceiling look like a sheet of glass.
Ready to say goodbye to the 70s? Contact us today and let’s talk about how we can transform your space safely and professionally. Would you like us to handle the testing for you, or are you looking for a full-service removal and paint job? Just let us know!