
How to Remove Popcorn Ceilings Without the Mess (Yes, It’s Possible)
Let’s be honest for a second. Nobody looks up at a popcorn ceiling and thinks, “Wow, what a masterpiece.”
It’s usually the opposite. You’re lying in bed or sitting on the couch, staring up at those weird, bumpy shadows, wondering why anyone in the 1980s thought spraying acoustic texture all over the place was a good idea. It collects dust, it’s impossible to clean, and it instantly dates a room.
But here’s the thing that stops most of us from doing anything about it: The Mess.
We’ve all heard the horror stories. You scrape a patch, and suddenly your entire house looks like a snow globe. Dust in the carpet, dust in the HVAC vents, dust in your coffee three days later. It’s a nightmare.
But it doesn’t have to be.
Over the years, working with Precision Paint Experts, I’ve learned that while removing popcorn is hard work—and I won’t lie to you, your neck will be sore—it doesn’t have to be a disaster zone. There is a way to do it cleanly, efficiently, and end up with that modern, smooth finish you’re dreaming of.
Here is how we tackle the beast, step by step.
Phase 1: The Setup (Do Not Skip This)
If you take one thing away from this guide, let it be this: The prep work is more important than the scraping.
If you rush the prep, you will spend weeks cleaning up. If you nail the prep, the cleanup takes ten minutes. Seriously.
What You’ll Need
This isn’t just a scraper job. To go “dustless” (or as close to it as physically possible), you need the right gear:
- A “Dustless” Sander: This is a pole sander attached to a shop vac with a HEPA filter. This is the secret weapon.
- Plastic Sheeting: Get the heavy-duty stuff (4-6 mil) for floors and lighter stuff for walls.
- Painter’s Tape: The good stuff that sticks but doesn’t peel your paint.
- A Garden Sprayer: Filled with warm water.
- Wide Drywall Knives: 6-inch and 12-inch.
- Mud Pan: For the skim coating later.
- PPE: Respirator (not just a flimsy mask), goggles, and a hat. Trust me, wear a hat.
The “Kill Room” Strategy
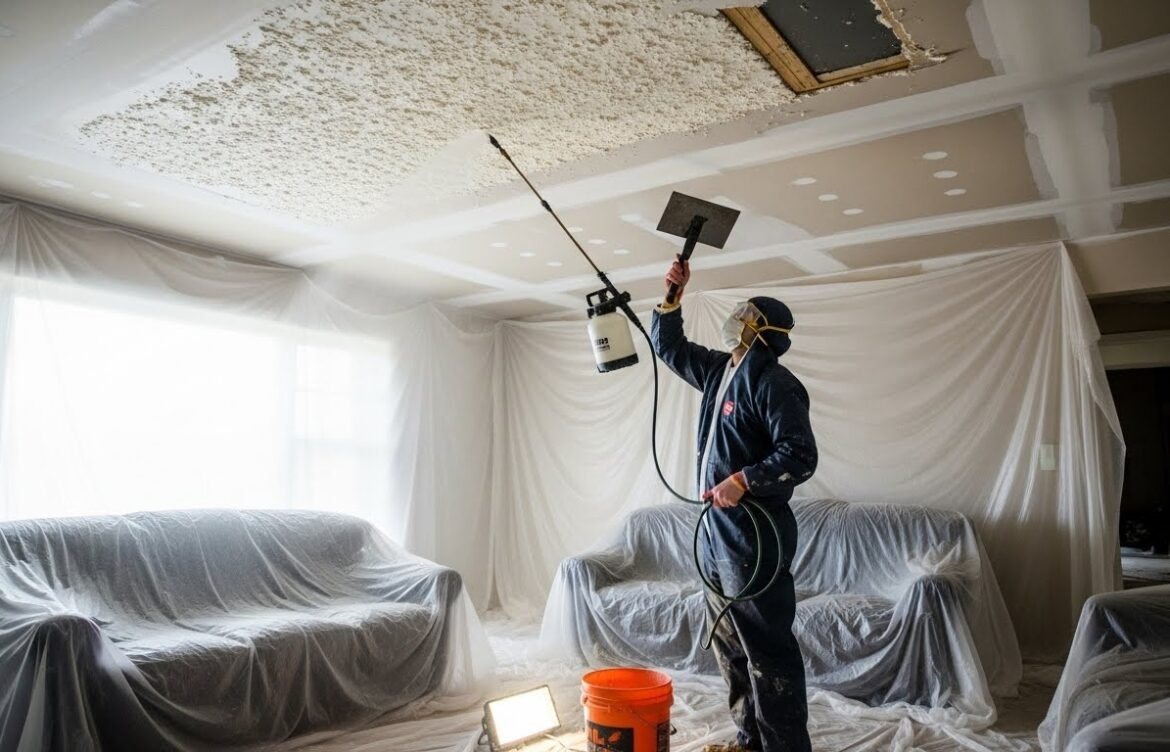
You need to seal the room. Completely.
- Clear the deck: Move all furniture out. If you can’t move it, center it and wrap it like a mummy.
- Floor protection: Lay down the heavy plastic on the floor. Run it up the wall about 6 inches and tape it. This creates a “tub” that catches everything.
- Wall protection: Hang lightweight plastic from the top of the walls (right under the crown molding or ceiling line) and drape it down to overlap the floor plastic.
- Seal the vents: This is critical. Turn off your AC/Heat and tape plastic over the vents. You do not want dust getting sucked into your system.
Phase 2: The Removal (The Satisfying Part)
Before you start scraping, we need to address the elephant in the room: Asbestos.
If your home was built before the early 80s, stop right now. Go get an asbestos test kit. It costs a few bucks and takes a few days for results. If it’s positive, do not touch it. Call a pro. It’s not worth your lungs.
Assuming you’re in the clear, here’s how we do it at Precision Paint Experts.
Step 1: The Wet Down
Dry scraping is a dust storm waiting to happen. Wet scraping is where it’s at.
Take your garden sprayer and mist a 5×5 foot section of the ceiling. You don’t want it dripping wet—just enough to soak into the texture. Let it sit for about 10-15 minutes. The water breaks down the binder in the texture, turning it into a sludge rather than a powder.
Step 2: The Scrape
Get on your ladder (or scaffolding, if you’re fancy). Take a wide scraper and gently—gently—push against the texture.
If you’ve soaked it right, it should fall off in sheets, kind of like peeling a sunburn. It should drop straight down onto your plastic.
Pro Tip: File the corners of your metal scraper down just a tiny bit. Sharp corners love to dig into the drywall paper, and fixing those gouges later is a pain.
Step 3: The “Dustless” Sanding
Once the bulk is gone, there will be residue. This is where people mess up and create dust clouds.
Don’t just dry sand it yet. Connect your pole sander to your shop vac. The vacuum sucks the dust through the sanding screen before it can escape into the air. It’s loud, but it keeps the air clean. Go over the whole ceiling to knock down high spots.
Phase 3: The Skim Coat (Where the Magic Happens)
Okay, the popcorn is gone. But underneath? The drywall probably looks rough. The joints might be ugly because the builders knew the texture would hide them.
To get that luxury smooth look, you need to skim coat. This is an art form. It’s something our team specializes in because getting it perfectly flat takes practice. You can read more about our specific approach to ceiling painting and removal here.
The Process:
- Mix your mud: You want joint compound that’s the consistency of thick yogurt. A little water helps it flow.
- Apply thin: Use a wide knife (12-inch is best) to spread a thin layer of mud over the ceiling. You aren’t building a wall; you’re just filling the pores and evening the surface.
- Wipe it tight: Apply it, then wipe it almost all off.
- Let it dry: Give it a day.
If the ceiling was in really bad shape, you might need a second coat. It’s tedious, but this is the difference between “DIY looking” and “Professional Grade.”
Phase 4: Sand, Prime, Paint
Once your skim coat is dry, hook that vacuum sander back up. Sand the whole thing smooth.
Close your eyes and run your hand over the ceiling. If you feel a bump, sand it. If you feel a divot, fill it. Your hand is a better judge than your eyes.
Important: You must use a high-quality drywall primer before painting. The fresh mud will soak up paint like a sponge if you don’t seal it first.
Finally, roll on two coats of flat ceiling paint. (Always flat—gloss on a ceiling highlights every single imperfection).
Troubleshooting: What Could Go Wrong?
Problem: The popcorn is painted over.
- Analysis: If a previous owner painted the popcorn, water won’t soak in. It won’t scrape easily.
- Solution: You have two choices. You can dry sand it off with a heavy-grit paper (super dusty, even with a vacuum), or you might need to skim coat over the texture (hard to get smooth). In this case, honestly? It might be time to call in a crew.
Problem: I gouged the drywall paper.
- Analysis: It happens. You got aggressive with the scraper.
- Solution: Don’t panic. Seal the torn paper with an oil-based primer (or a specialized product like Gardz) before you mud over it. If you mud directly on torn paper, it’ll bubble up. For more on fixing wall issues, check out our drywall repair guide.
Expert Tips for a Perfect Finish
- Lighting Check: When you think you’re done sanding, grab a bright LED work light. Hold it against the ceiling and shine it across the surface (this is called raking light). It will reveal every scratch and bump you missed. It’s unforgiving, but it ensures perfection.
- The “Edge” Game: Pay special attention to the corners where the ceiling meets the wall. If you leave clumps there, your cut-lines for the wall paint will look wavy and sloppy.
Summary
Removing a popcorn ceiling is a transformation. It changes the lighting, the acoustics, and the entire vibe of your home. It makes ceilings feel higher and rooms feel cleaner.
Is it messy? It can be. But with the right plastic setup and a vacuum sander, it’s manageable.
Is it hard work? Absolutely. It’s a shoulder workout you won’t forget.
If you’re reading this and thinking, “I want the smooth ceiling, but I absolutely do not want to be on a ladder for three days,” I get it. It’s a big undertaking.
That’s where we come in. At Precision Paint Experts, we handle the masking, the scraping, the skimming, and—best of all—the cleanup. Whether you need help with interior painting or just want that texture gone, we’re here to help.
Ready to see what your home looks like without the popcorn? Contact us for a free quote and let’s bring your ceilings into this century.